Note : this tutorial works best for images taken indoors with a good amount of natural lightning , could work for anything else though , but best on the mentioned previously
Now let's get down to business *_*
First of all we open our image, i got this picture from stock exchange , here's a quick tip , NEVER get a picture from deviant art or anything displayed on forums as صور التصميم which are taken from DA as well ! because all of those images are edited already and that will will guarantee that they won't sue your butt ^_^
and here's the original image

Now the orignal background layer will have a lock icon on it , click it twice and then click ok as the window appears . sorry i forgot to explain that in a snapshot !
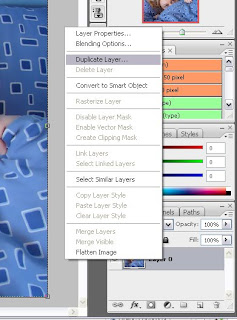
Now your layer is ready , duplicate it by right clicking it > duplicate layer
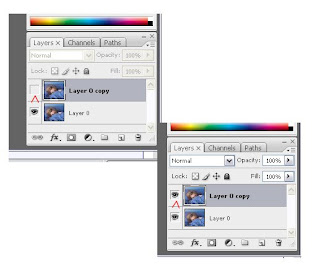
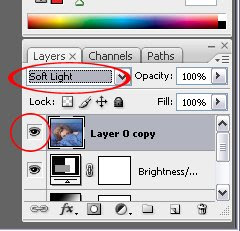
Next, hide the copy you made as we're only working on it to make the last touches , the hiding is very simple , done by clicking the eye icon on the left , the icon indicates the layers invisibility , make sure the eye is gone :)
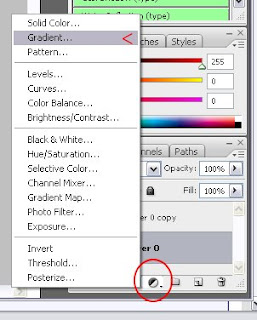
Now back to the original layer , click the adjustment layer icon in the bottom of the layers palette , and choose a Gradient adjustment layer *
from the gradients collection choose black and white , then change the blending mode to Color
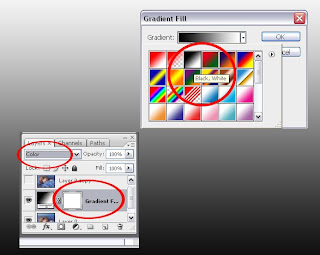
You will get a black and white picture ^^ now next step is to get the high key effect , a new adjustment layer , Brightness and Contrast
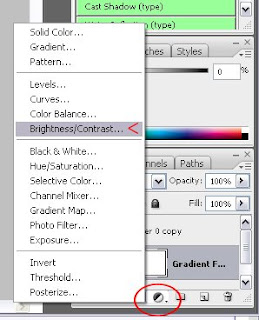
Set the
brightness to 60 Contrast to 80
For the last touch , we're going to make the invisible copy of the original layer visible again , simply by clicking the eye visibility icon , and set the layer's blending mode to Soft Light
We're done ^^
here's the result and the original image


* I have used a gradient layer assuming that many may not have CS3 , but if you do , a black and white layer is easier to use and without changing it's blending mode , this is only for Cs3 users
NoteS : you may use a solid color adjustment layer and set it's blending mode to Color isntead of a copy of the original layer , i have tried this with sepia , not bad !

another thing , you can leave it as a black and white photo once you've set the brightness and contrast , will be good as well
Any further questions i'm here , and excuse me if i'm bad at this =(


3 comments:
thanks fooof :).. I'm trying it .. not so good to pts..
coooooool!
I'm gonna save this and try it when my pc is ready (thats after shutting every other running application) :d
keep'em cominnnnnnnnnnnn
Rawia : keep trying sweety it's so simple , just a couple of layers but i explained it too much for beginners :D
Naser : which is impossible lol , i will inshallah , everytime i figure out new techniques I'll post tutorials
i need your help in something :(
Post a Comment