As requested by Sarah
There are various ways for you to achieve this effect using photoshop, or any other software for that matter, I'm just going to attempt to explain this in the simplest way possible, and by explaining certain steps that will help you later on in editing even if you don't want the vintage effect.
It's basically a washed surface of the picture, distorted edges, yet the colors are still vibrant and saturated
the easiest thing for me to do , is to give you this image, and ask you to fit it on a picture
because it will achieve almost everything, except one thing, you practically haven't learned anything.
so let's move on to the real deal :D
I will use this picture because it's a daffodil, and they are awesome
The first thing you're going to do is add the desired texture, I chose a very light old paper texture, try to choose one that is not too grungy, that is not a work of art itself, something stable and works like a fine base for the beigey overall tone you're looking to achieve, but has a little bit of grunge to add texture to the photograph and complete the old photo effect.
this is the one i have used
as you can see it's very simple, more like a color filter
Now, the complicated process that is adding to the photo :@ lol
Adding the texture
I am not going to add a screenshot for this because i have too much respect for you, so all you have to do is download the image, open it in photoshop , Ctrl+A then Ctrl+C
Go on to the main image you're editing, and paste
and since you had a problem with this step, if the texture doesn't already fit your picture completely ( which is the usual case ) fit it onto the photo using the transformation points, they should appear as soon as you click the texture .
You can see that the picture has a slightly beige undertone now, and it looks more washed out but it will be fixed later, also, you can notice the caused by the texture
Solid Color Layers
These layers are going to affect the shadows and undertones in the photo as well, since the above is washed out and the colors are pretty dull, these are meant to add more color, yet not enough vibrancy, this will be controlled later
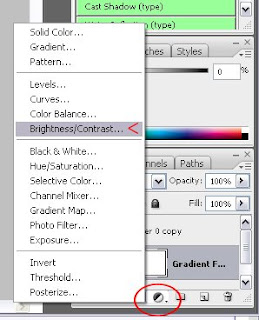
now go back to the layers box, you will see a small icon in the shape of a circle half black and half white
clicking it, a menu will appear, choose Solid Color
After choosing the color, you're going to work with the blending modes again
so just a simple explanation of the colors you'll be using and what blending modes to set them to
Choose a Violet color, like this one but darker , and set the layer's blending mode to Exclusion
and change the opacity to 70%
Choose a golden orange color, like this one but deeper, and set the blending mode to Multiply
and it's opacity to 20%
These two colors will balance each other out while giving more color to the picture, and softening it's shadows
this is what it looks like so far
the colors have changed but it's still washed out, now time to add the contrast
The Black and white layer
I love using this to add contrast because i think it it automatically highlights and emphasizes the shadows of the picture without adding a contrast that is too harsh to all the points. It's extremely simple
Go back to the Adjustment Layers button, and choose Black & White
after the layer is added, set it's blending mode to Soft light
Now to the final step, or two steps actually
right click any layer in the layers list, and choose the option : Merge Visible , it will merge all the layers into one, you will be doing this so the next effect will take place on the finished photo and look stronger
Vignette
Go the Filters menu, and choose Lens correction, If you happen to have an older version of PS, this would probably be under the filter Render>Lens correction
I am currently using PS CS5, If you are, then great !
once you choose it , this box will appear , in older PS version the custom window is selected by default, in CS5 however, it is not
As for the amounts set in the screenshot, they are not necessarily obligatory , to be fair i just keep decreasing the first and increasing the second till i get the satisfying result !
aaand you're done !
voila :)
There are various ways for you to achieve this effect using photoshop, or any other software for that matter, I'm just going to attempt to explain this in the simplest way possible, and by explaining certain steps that will help you later on in editing even if you don't want the vintage effect.
It's basically a washed surface of the picture, distorted edges, yet the colors are still vibrant and saturated
the easiest thing for me to do , is to give you this image, and ask you to fit it on a picture
because it will achieve almost everything, except one thing, you practically haven't learned anything.
so let's move on to the real deal :D
I will use this picture because it's a daffodil, and they are awesome
this is the one i have used
as you can see it's very simple, more like a color filter
Now, the complicated process that is adding to the photo :@ lol
Adding the texture
I am not going to add a screenshot for this because i have too much respect for you, so all you have to do is download the image, open it in photoshop , Ctrl+A then Ctrl+C
Go on to the main image you're editing, and paste
and since you had a problem with this step, if the texture doesn't already fit your picture completely ( which is the usual case ) fit it onto the photo using the transformation points, they should appear as soon as you click the texture .
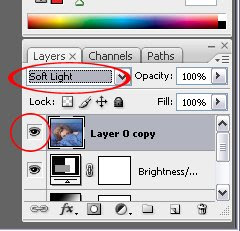
Now after they're layered evenly , choose the texture layer ( make sure it's the one selected ) and change it's blending mode to Soft light, here's how you do that
Drop the circled menu and choose Soft Light
Here's the result in this case ..
You can see that the picture has a slightly beige undertone now, and it looks more washed out but it will be fixed later, also, you can notice the caused by the texture
Solid Color Layers
These layers are going to affect the shadows and undertones in the photo as well, since the above is washed out and the colors are pretty dull, these are meant to add more color, yet not enough vibrancy, this will be controlled later
now go back to the layers box, you will see a small icon in the shape of a circle half black and half white
clicking it, a menu will appear, choose Solid Color
After choosing the color, you're going to work with the blending modes again
so just a simple explanation of the colors you'll be using and what blending modes to set them to
Choose a Violet color, like this one but darker , and set the layer's blending mode to Exclusion
and change the opacity to 70%
Choose a golden orange color, like this one but deeper, and set the blending mode to Multiply
and it's opacity to 20%
These two colors will balance each other out while giving more color to the picture, and softening it's shadows
this is what it looks like so far
the colors have changed but it's still washed out, now time to add the contrast
The Black and white layer
I love using this to add contrast because i think it it automatically highlights and emphasizes the shadows of the picture without adding a contrast that is too harsh to all the points. It's extremely simple
Go back to the Adjustment Layers button, and choose Black & White
after the layer is added, set it's blending mode to Soft light
Now to the final step, or two steps actually
right click any layer in the layers list, and choose the option : Merge Visible , it will merge all the layers into one, you will be doing this so the next effect will take place on the finished photo and look stronger
Vignette
Go the Filters menu, and choose Lens correction, If you happen to have an older version of PS, this would probably be under the filter Render>Lens correction
I am currently using PS CS5, If you are, then great !
once you choose it , this box will appear , in older PS version the custom window is selected by default, in CS5 however, it is not
As for the amounts set in the screenshot, they are not necessarily obligatory , to be fair i just keep decreasing the first and increasing the second till i get the satisfying result !
aaand you're done !
voila :)


